Back when BluPrint was having its closing out sale, I bought as much fabric as I could afford (I wish I could have afforded more because they were really good prices and I especially liked their Boundless Botanical). Because I use them in my Quick and Easy Baby Quilts, I bought several layer cakes, plus coordinating fabric for backing when it was available. One of the layer cakes I purchased was the Lily and Loom Stir Crazy line. It features baking-themed fabric, plus other coordinates.
I also purchased 2 - 3-yard cuts of the light aqua baking equipment and supplies print, since I can make 2 baby quilts from one layer cake (plus background fabric) and each baby quilt requires approximately 3 yards for backing.
But... while it is a fun fabric line, is baking-themed fabric the most appropriate for baby quilts? No matter. It sat in my stash for the few intervening years. And currently, I am ahead of the game where baby quilts are concerned. Work Zone, Blast Off, Plum Perfect, Baby Alter Ego II, Leah's Ladder and Heat Wave are all waiting for the next baby to arrive. And I don't think I know anyone who is currently pregnant that I will be giving a quilt to. Since quilts are expensive and time-consuming, I only give one per family, unless it's my family, where everyone will eventually get one. But it was my goal to create a stash of baby quilts so I had some readily available should the need arise.
So, when I was looking through my Craftsy courses, and saw the Tumbler quilt in the Quilting Quickly II course, and realized that I had the MSQC tumbler template, I thought this would make a great project for a quilt for my dining room table. And I decided to do it now because it was one of those quick and easy projects that are just for fun when I need a break from the more intense quilting projects. Except that I did make it a little more complex because I decided to use the trimmings to make an extra border. I hate wasting fabric and so, aside from removing about 2" from the sharpest points of these trimmings, I ended up with a zero waste quilt.
Because it was a baking-themed layer cake, I chose the Sweetness pantograph to use for the quilting.
What fun quilting cupcakes! I used this Aurilux thread from my stash as I felt it had the perfect blend of colours for this quilt.
(It actually has more aqua than the picture shows). I managed to squeeze enough fabric out of the 2 - 3-yard cuts for the 2 borders, backing and binding. Here it is on my table.
In coming up with a name for this quilt, initially I was going to just call it Stir Crazy after the fabric line. But I really didn't like that name, so I started tossing around ideas connected with baking. And then the old Betty Crocker slogan came to mind (I still have the tune running through my head...) and I liked it. So that's how it became Bake Someone Happy.
I don't remember how many years ago I purchased this placemat pattern. It's fairly simple, made from 4 different fat quarters and offers 5 different choices of layout for the placemats. I chose variation 2. Because I had a bundle of 5 fat quarters, I also chose to make 5 placemats.
I like this set because they "match" as they all feature the same fabrics, but each one is unique. The pattern offers two different methods of finishing the placemats, either the "pillowcase" method (front and back, right sides together, including a layer of batting, stitch all the way around, leaving an opening to turn right side out, and then quilting), or the "binding" method (making a quilt sandwich in the usual way, quilting and then binding the edges). Obviously, I chose the binding method, and I also chose to quilt them on my longarm. As I've said before, if it's big enough to fit on the longarm, I will quilt it on the longarm. I used one complete piece of backing. Because the fabric is lemon-themed, I chose the Lemon Drop pantograph by Melonie Caldwell from Urban Elementz,
and a bright yellow Glide thread for the quilting. If I had chosen to quilt on m domestic machine or use the pillowcase method, I could have used 1 fat quarter for each placemat.
Normally, I do not use Walmart fabric in my quilts. Most of it is thin and inferior quality, though there is some that is reasonable quality. However, in making something other than quilts, like wallhangings or gift baskets or placemats, I am not necessarily so fussy. I have admired this fat quarter bundle at Walmart for a while. I love the lemon theme. It's so fresh looking. So I decided that this was a good project to use it in. They also sell individual fat quarters, so I used 3 of the sliced lemons for the binding. If I had only made 4 placemats, I would have needed just 2, but I couldn't quite make it around the 5th placemat using 2 fat quarters.
Not sure if I will keep this set or gift it, but I will say one thing: quilted placemats are much nicer than plastic ones, in my opinion, at least.
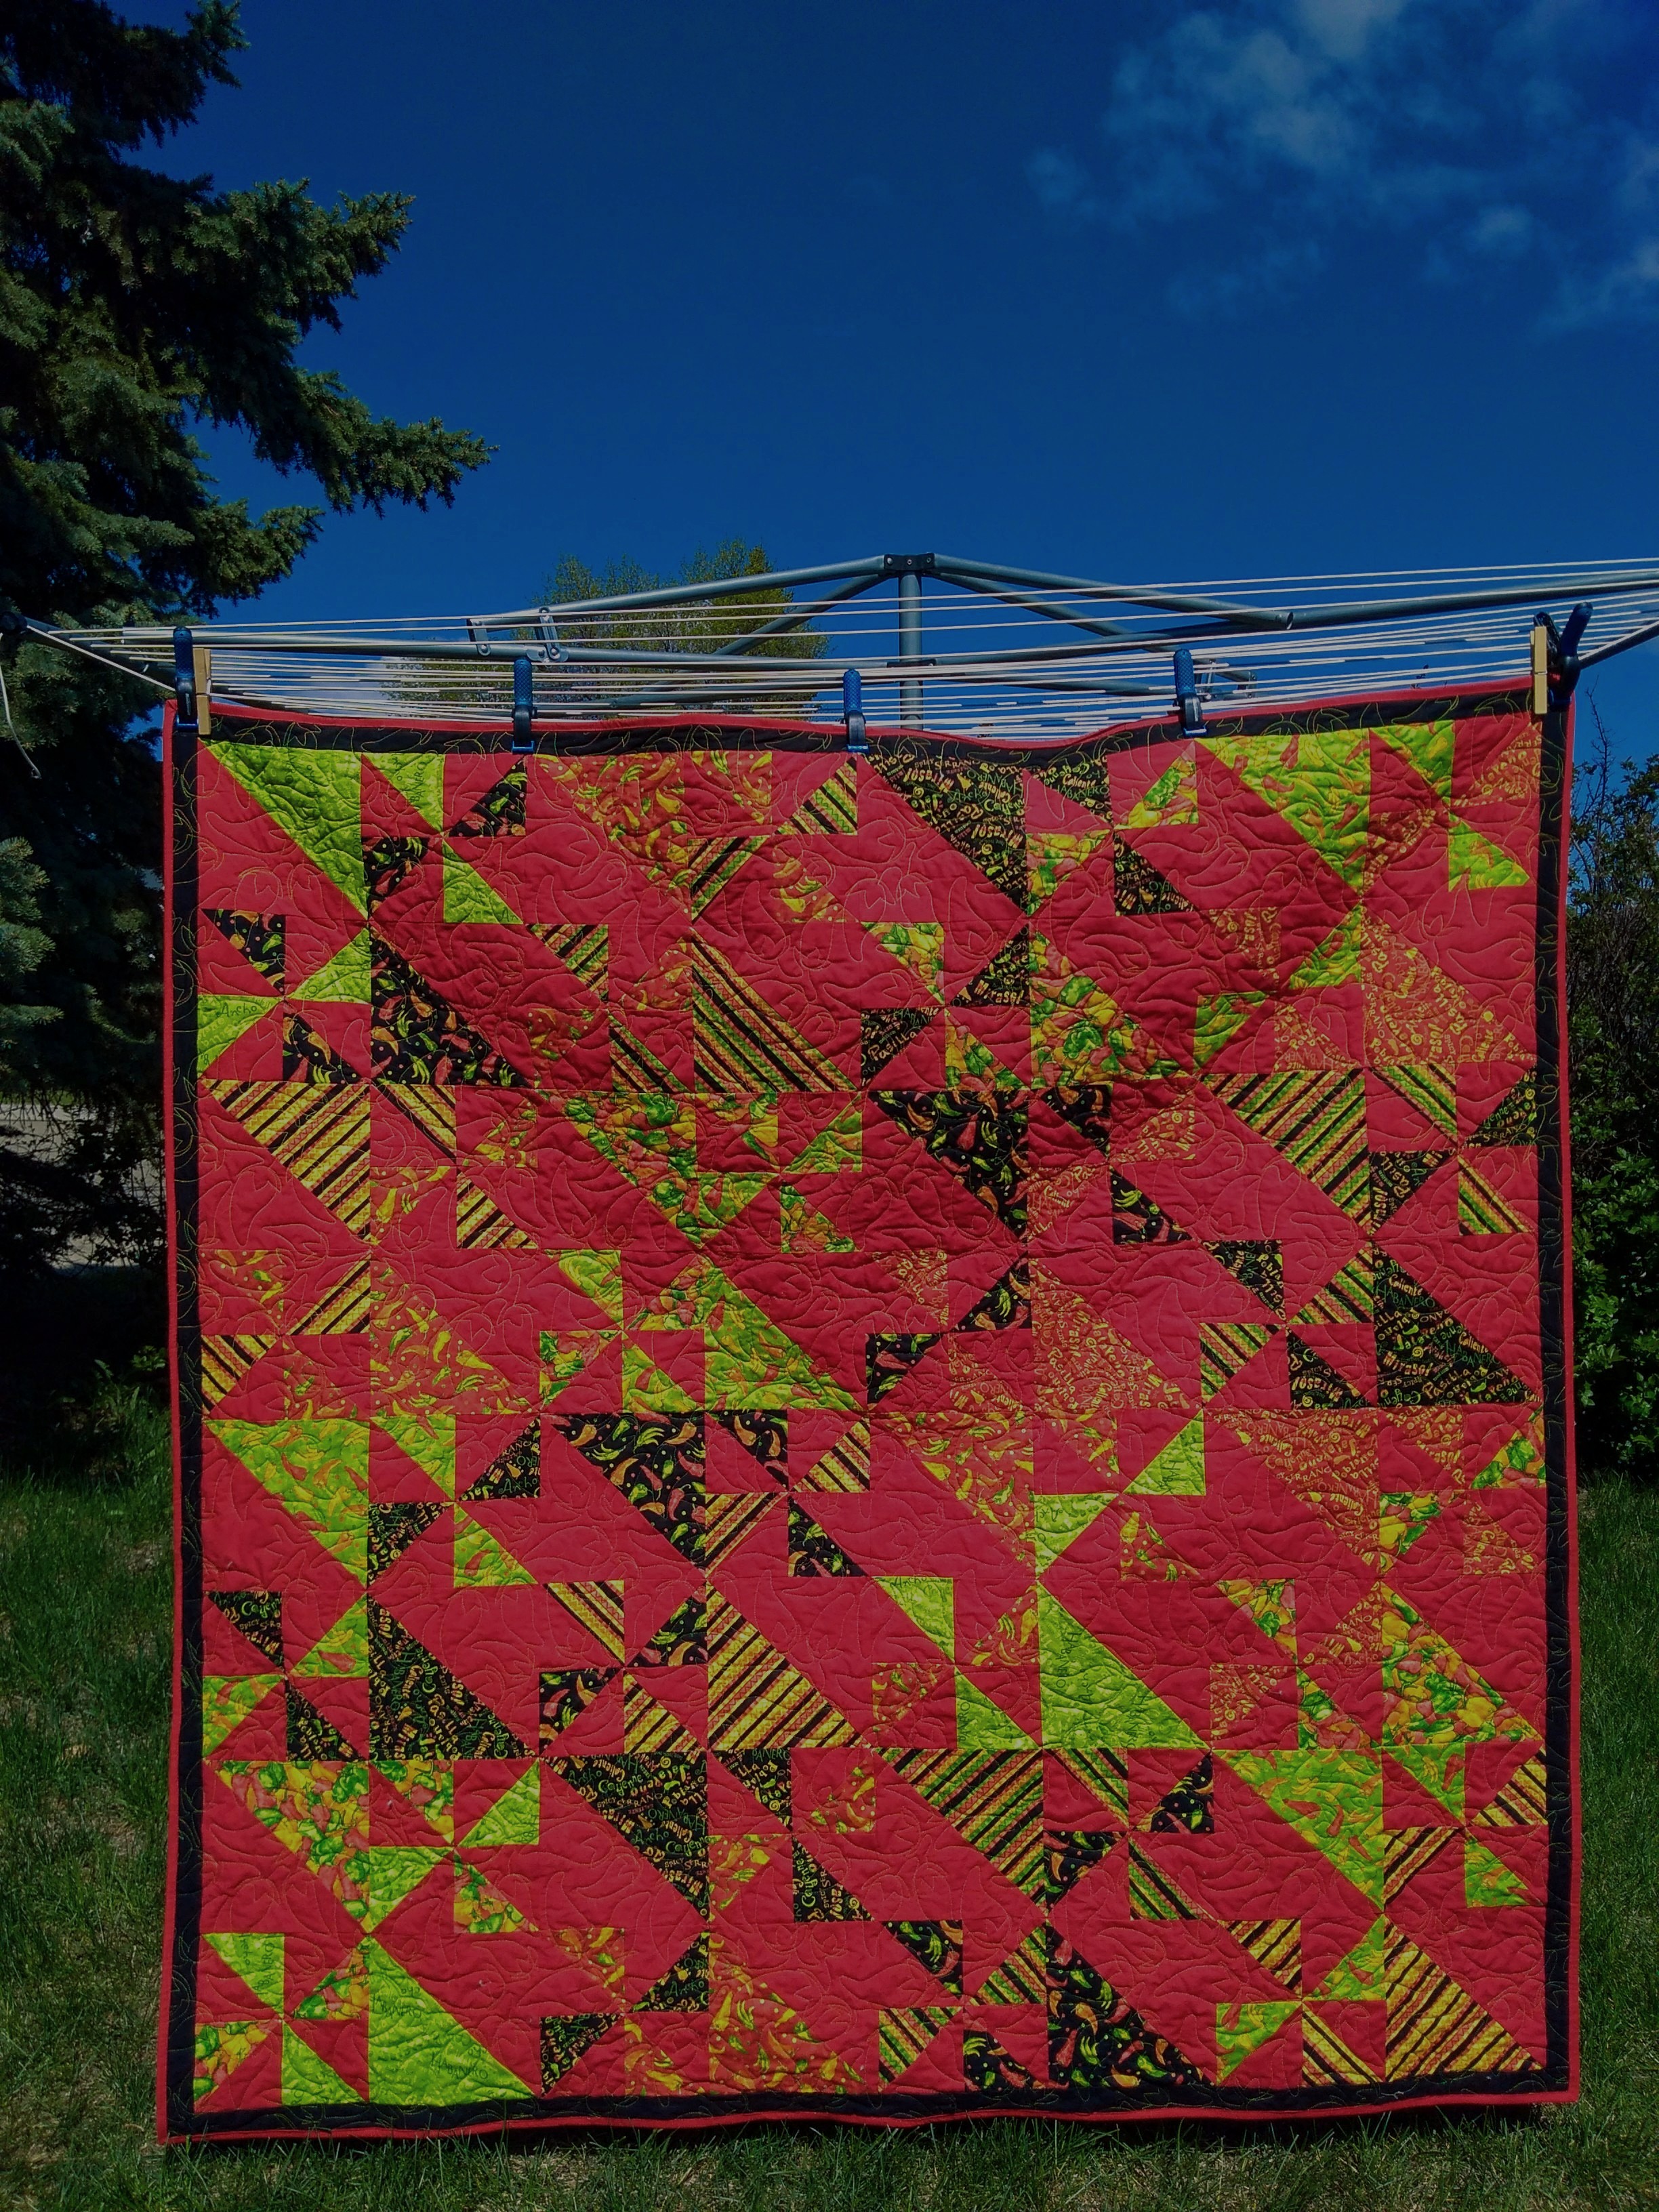
I had to darken the picture to make the colours look more true to life. Otherwise, the red looked faded and the other colours looked like they would glow in the dark.
Maybe I should just stop asking.
For people's favourite colours, hobbies and interests in order to incorporate them into their quilts, that is. After all, I have gifted many quilts without knowing the favourite colours of the recipients. And they have all been received with gratitude. However, it is nice to personalize them, if possible. But not only is it not always practical, it has not infrequently been a source of frustration and well nigh impossible.
Allow me to elaborate with a few examples. But first, let me explain by saying that I have asked family members for their favourites in advance, as it is my goal to make a quilt for every sibling, niece, nephew, great niece and great nephew (not to leave out my first great, great niece, who has already received hers). As I have stated previously, I seldom buy fabric that is not on sale. So, when I see some sale fabric that would work well for a given family member, I will often purchase it, but I may not get around to making the quilt for a few years. Work and other projects often take priority and I can only make so many quilts in any given time span. But it's great to have the supplies for that project in my stash for when I get a chance to work on it.
However, I haven't heard back from every family member, or their parents, in the cases of children too young to respond. Maybe that makes it easier, because then I can give them whatever quilt I want. I was told that the favourite colours of one great niece were pink and yellow, and she was also a dancer. So I had purchased fabric for a pink and yellow, dance-themed quilt. Before I had the opportunity to make that quilt, she was no longer dancing and fell in love with a quilt block I shared on Facebook. So that's the quilt she got, and now I have to figure out who will get the pink and yellow dance quilt. A great nephew liked blues and greens, but now he likes purple. Another niece told me she wanted a quilt in red, white and blue, so I purchased fabric in her colour choices. But then I think she forgot that's what she asked for and asked me for a Christmas quilt instead. I think before I make her quilt up, I will ask her once more... Meanwhile, I figured I could make the red, white and blue quilt for the great nephew who is the recipient of the quilt pictured above, as I was told that his favourite colour was red. "Was" is the operative word. As his graduation is coming up, when I finished the Double Star quilt, I figured that quilt would do. Unfortunately, I then found out that red is no longer his favourite and he now likes bright colours, although his mother did say that he would likely be happy with the Double Star. <sigh> So, I started the Flower Power quilt as the bright-coloured option in my stash with no intended recipient.
However, once I had a row made up, I thought that it was too pretty and femine for a young man. With graduation only a week away, how was I going to be able to pull together an alternate quilt in that amount of time? My anxiety kicked in and I couldn't sleep, so there I was rummaging in my quilt studio in the wee hours of the morning. The Children of Israel quilt would have been ideal, with its bright colours without being pretty and feminine, but it's Jewish-themed and already has an intended recipient.
The red, white and blue quilt I had previously considered was too detailed to complete in such a short time. I pulled out a layer cake in more or less bright coloured solids and another in black, figuring I could do something with that. I considered a larger version of one of my Quick and Easy Baby Quilts, but I didn't think that was personal enough for a family member. I also toyed with the idea of the 10-minute quilt block, but didn't feel it would like great in solids. I watched a few other YouTube videos, but really didn't find anything suitable. And I really didn't have time or money enough to start from scratch.
Then I remembered the chili pepper quilt: it's bright and appropriate for a man. Thank the Lord! Interestingly, this is one of the quilts I had originally considered for this great nephew, together with Finish the Race, back when red was still his favourite colour. But red is a bright colour, and, together with all of the other colours, I think it's sufficiently bright enough to make him happy.
This is the first time I've tried a Moda Cake Mix Recipe.
This is a pad of 44 sheets of 10" square papers, preprinted with stitching and cutting lines, for use with fabric layer cakes. You take one sheet of paper, together with a square of print fabric and one of background, stitch and cut along the appropriate lines and then assemble the resulting pieces according to one of the block layouts on the front of the pad. My pad was recipe 1 and I used block 4.
Honestly, I wasn't sure if I actually liked this block, but I continued, hoping that once I saw more blocks together, I would be happier with it. And now that it's altogether, I'm very happy with it. It's a fun quilt.
While I do find that the Cake Mix Recipe makes using layer cakes easier and more flexible, I'm not sure if I really like the concept. I keep going back to the idea that, for most quilt designs, yardage works better than pre-cuts.And you have to pin the papers to the fabric. I very seldom use pins, and when I do, I usually end up poked at least once. If I really need extra help holding things together, I prefer quilt clips. But this is not an application where clips would work. So, pins it is. And I did end up poked several times. Furthermore, the rotary cutting blade dulls quite quickly, cutting through all of that paper. Plus, you have to add in the time it takes to remove all of the papers once you've done all of the stitching and cutting. However, I still have quite a few layer cakes in my fabric stash and, aside from my Quick and Easy Baby Quilt concept, I think that this will become my new favourite for using them. So, I am likely to buy more Cake Mix Recipes.
Back to the quilt, another objection I have to layer cakes is that, once you've made a quilt with them, you then need to find coordinating fabrics for borders and binding. I don't often think about that when I buy the layer cake. And often, I buy them on sale, so I'm limited to what's available at the time I purchase the layer cake, or what I can find that will work with the layer cake when I finally get around to using it several years down the road.
I suppose there are dozens of variations on the colour red. I had some red solid fabric that I would have liked to use for the border on this quilt, but it wasn't quite the same shade as the solid red layer cake. I rummaged around in my vegetable fabric to see if I had a pepper fabric that might work, but no. I have cauliflower, tomatoes, red onions, etc, but not peppers. I do, however, still have plenty of fabric on my bolt of solid black, so I opted for that for my border and used the solid red for the binding where the slight difference in shade won't be so noticeable.
And, for the backing, I had this in my stash.
I think I originally bought it for the Go Broncos quilt for another great nephew's graduation from university, but opted for a WMU Broncos fabric instead. Then I thought of using it as the backing for a quilt for when one of my nephews graduated from college, but that was already a few years ago and I still haven't made the quilt. And, personally, unless a quilt with this kind of fabric is given on or around the actual graduation, it seems rather dated, irrelevant, ridiculous.
Now on to the quilting part. I had originally purchased the Mexicali pantograph to use with this quilt. But this design is only 4.5" wide and has lots of straight lines, corners and points, so pretty labour intensive. And I was under a time crunch. I next considered Zen in the Sun. Also, lots of points, and some straight lines, but a wider pantograph at 10". But the focus of the fabric in the print layer cake is hot peppers, and I remembered seeing a hot pepper pantograph. And I found it: Abundant Peppers from Urban Elementz. Just saying that I love this pantograph and it suited the quilt to a T. What I don't love is self-print pantographs. I don't like using my copy paper and my toner and mostly I don't like having to line up and tape all the pages together. But with my great nephew's grad looming, I didn't have time to order it, and neither of my primary Canadian vendors carry it anyway. However, I decided to try tracing the design onto a paper roll that I bought for making my own pantograpsh. That really wasn't a great option either, but it worked.
The quilting thread might look light grey/white, but it is actually a variegated yellow/orange/green.
I had already chosen a thread from my stash. I wanted something that would stand out against the red, and chose a variegated yellow/orange/green.
It matches the colours of the peppers. I had never used this particular thread before,
and when I looked for it on the Superior Threads website to find what size of needle it suggested, it couldn't be found. It looks fabulous against the red, but I was having constant breakage. I tried everything I could think of: adjusting the tension both up and down, different needle sizes: 16, 18 and 20, loosening the quilt up on the frame, piece of batting in the thread mast, no batting in the thread mast... I persisted almost halfway through the quilt, but finally gave up and switched to Glide. When I asked about this thread in a Facebook longarm quilting group, one commenter said that Superior made it way back when they first started up. Another Googled it, and found this info: "#30/3-ply extra-strength Spun Polyester thread. Designed for longarm and home machine Quilting. 2000 yd cones. The look of cotton with the strength of polyester. Poly Quilter has been designed for longarm and home machine quilting and decorative apparel stitching. Available in 26 variegated colors. As a heavier 30 wt. thread, Poly Quilter is intended to stand out." G-Poly Quilter Longarm Quilting Thread - Accomplish Quilting. Well, I've still got most of those 2000 yards, so I will no doubt try again, utilizing some of the suggestions I received on Facebook: Sewer's Aid, a size 21 needle, stitch slower with a longer stitch length (10 or less), plus my own thought of prewashing the backing. as recommended in this video: I've tried pretty well everything else.
When I took this quilt outside and hung it on the line to take its picture. I discovered something. Something rather alarming and disappointing: a hole in the backing fabric! The sun was bright, hitting the front of the quilt and I could see a white spot towards the middle of the quilt: a very large piece of lint? No, it was a hole. Not sure how or where that came from, whether it was a flaw in the fabric or if it got caught on something while I was wrestling with the quilt to get the binding sewn on (there has to be a better way...). Disappointing though it was, I'm glad I found it before I had gifted the quilt. Matching up a small square of fabric to the spot as best as I could, I stuck it on with Heat'N'Bond and then zigzag stitched the edges. Fortunately, it was behind a print area of the quilt top, and I was able to thread-match the fabric relatively well, so you'd really have to search for it to find it.
Done and ready to be gifted. I just have to find a gift bag the right size. Just for the curious, here's the original photo of the quilt, before retouching. I feel like I need to wear sunglasses to look at it.